
AWS Deployment Azure Deployment
Summary
SQL Server 2016 on cloud uses transparent Data Encryption (TDE) to ensure your data is always encrypted. If in-memory Online Transaction Processing, or OLTP, is the future of computing, SQL Server 2016 takes the lead. In-memory OLTP was first built into SQL Server 2014, and SQL Server 2016 now boasts industry-leading capabilities. Businesses experience near-instant transactions when running reports and complex queries. And on the front end, customers experience instant and easy transactions.
Its feature AlwaysOn Availability allows organizations to protect data with ease — and flexibility. SQL Server uses data mirroring to improve failover for groups of databases (an improvement over earlier versions that used the same technique for just one database). It’s a mission-critical disaster recovery feature, built in to the platform from the start. Maintain more impressive uptime and streamline your maintenance operations. You have more options in how you protect your data — and greater peace of mind.
CloudMint Provides Enterprise Ready images of SQL Server 2016 on the cloud ( AWS marketplace, Azure and Google Cloud Platform).
Deploy SQL Server 2016 on cloud ( AWS marketplace, Azure and Google Cloud Platform (GCP))
Core data management and business intelligence capabilities with minimal IT resources.

Highlights
Major Features of SQL Server 2016 on cloud
Simplify big data
Take advantage of non-relational data with PolyBase technology built in that allows you to query structured and unstructured data with the simplicity of T-SQL.
Mission critical intelligent applications
Deliver real-time operational intelligence by combining built-in advanced analytics and in-memory technology without having to move the data or impact end user performance.
Highest performing data warehouse
Scale to petabytes of data for enterprise-grade relational data warehousing—and integrate with non-relational sources like Hadoop—using scale out, massively parallel processing from Microsoft Analytics Platform System. Support small data marts to large enterprise data warehouses while reducing storage needs with enhanced data compression.
Mobile BI
Empower business users across the organization with the right insights on any mobile device.
Easy to use tools
Use the skills you already have, along with familiar tools like Azure Active Directory and SQL Server Management Studio, to manage your database infrastructure across on-premises SQL Server and Microsoft Azure. Apply industry-standard APIs across various platforms and download updated developer tools from Visual Studio to build next-generation web, enterprise, business intelligence and mobile applications.
AWS
Installation Instructions For Windows
Installation Instructions For Windows
Step 1) RDP Connection: To connect to the deployed instance, Please follow Instructions to Connect to Windows instance on AWS Cloud
1) Connect to virtual machine using following RDP credentials:
- Hostname: PublicDNS / IP of machine
- Port : 3389
Username: To connect to the operating system, use RDP and the username is Administrator.
Password : Please Click here to know how to get password .
Step 2) SQL Connection: To Connect Microsoft SQL Server Management Studio in windows server, Please follow Instructions to Connect Microsoft SQL Server Management Studio
Step 3) Database Credentials: You can Login by below SQL Database credentials
SQL UserName : sa || Password : TChangeh&33plz7@L
Note: You can reset ‘sa’ password by using windows authentication to connect to local SQL instance. Please use localhost in the server name when connecting from inside the RDC.

Please change the password after the first login.
Step 4) Other Information:
1.Default ports:
- Windows Machines: RDP Port – 3389
- Http: 80
- Https: 443
- SQL Server Port: 1433 this is by default not allowed on the firewall for security.
Installation Step by Step Screenshots


Installation Instructions For Windows
Installation Instructions For Windows
Step 1) VM Creation:
1. Click the Launch on Compute Engine button to choose the hardware and network settings.
2.You can see at this page, an overview of CloudMint Image as well as the estimated cost of running the instance.
3.In the settings page, you can choose the number of CPUs and amount of RAM, the disk size and type etc.
Step 2) RDP Connection: To connect to the deployed instance, Please follow Instructions to Connect to Windows instance on Google Cloud
Step 3) SQL Connection: To Connect Microsoft SQL Server Management Studio in windows server, Please follow Instructions to Connect Microsoft SQL Server Management Studio
Step 4) Database Credentials:
You can Login by below SQL Database credentials
SQL UserName : sa
The below screen appears after successful deployment of the image.
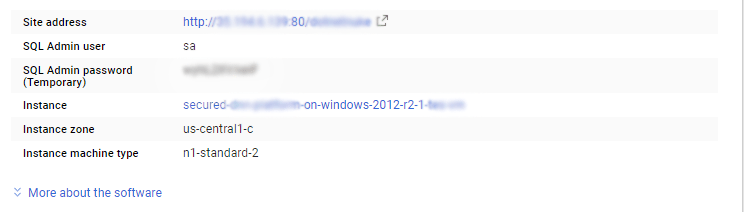
i) Please connect to Remote Desktop as given in step 2
ii) You can use SQL server instance as localhost. The SQL Server instance name to be used is “localhost” Connect to SQL Management Studio with username as sa and password provided in Custom Metadata.
If you have closed the deployment page you can also get the sa password from VM Details “Custom metadata” Section.
Step 5) Other Information:
1.Default ports:
- Windows Machines: RDP Port – 3389
- sql server port :1433: By default, this is blocked on the Public interface for security reasons.
Videos
SQL Server 2016 on Cloud