
AWS Deployment Azure Deployment
Summary
SQL Server 2012 is a full-featured relational database management system (RDBMS) that offers a variety of administrative tools to ease the burdens of database development, maintenance, and administration.
SQL Server 2012 is latest cloud-ready information platform. Organizations can use SQL Server 2012 to efficiently protect, unlock, and scale the power of their data across the desktop,mobile device, datacenter, and either a private or public cloud.
CloudMint Provides Ready images of SQL Server 2012 Standard Edition on the cloud ( AWS marketplace, Azure and Google Cloud Platform).
Deploy SQL Server 2012 Standard Edition securely on cloud i.e. AWS marketplace, Azure and Google Cloud Platform (GCP)
Highlights
Major Features of SQL Server 2012 Standard Edition
- Error Handling – In SQL Server 2012, a new THROW statement is used to raise exceptions in T-SQL code instead of RAISERROR.
- Column Store Indexes – Column store indexes that can be used to improve query performance. It is used in data warehousing.
- Business Intelligence – SQL Server 2012 Microsoft introduced a new model called Business Intelligence Semantic Model (BISM) to support a broad range of reporting and analysis needs. BISM is a relational model. That supports two type of model that meet most of your reporting and analysis needs.
- Multidimensional Model
- Tabular model
- Sequence Objects – In SQL Server 2012, there is an interesting option to utilize called Sequence. Sequence is a user-defined object that creates a sequence of a number.
- User Defined Server Level Role – SQL Server 2012 a database administrator can create a User Defined Server Role and even add a SQL Server Level Permissions to the User Defined Server Role. This feature will definitely help many organizations to delegate non critical work to junior database administrators.
AWS
Installation Instructions For Windows
Installation Instructions For Windows
Step 1) RDP Connection: To connect to the deployed instance, Please follow Instructions to Connect to Windows instance on AWS Cloud
1) Connect to the virtual machine using following RDP credentials:
- Hostname: PublicDNS / IP of machine
- Port : 3389
Username: To connect to the operating system, use RDP and the username is Administrator.
Password: Please Click here to know how to get password
Step 2) SQL Connection: To Connect Microsoft SQL Server Management Studio in Windows server, Please follow Instructions to Connect Microsoft SQL Server Management Studio
Step 3) Database Credentials: You can Login by below SQL Database credentials
SQL UserName : sa || Password : TChangeh&33plz7@L
Note: You can reset ‘sa’ password by using windows authentication to connect to local SQL instance. Please use localhost in the server name when connecting from inside the RDC.

Note: Please change the password after the first login.
Step 4) Other Information:
1.Default ports:
- Windows Machines: RDP Port – 3389
- Http: 80
- Https: 443
- SQL Server Port: 1433 this is by default not allowed on the firewall for security.
Configure custom inbound and outbound rules using this link
Installation Step by Step Screenshots


Installation Instructions For Windows
Installation Instructions For Windows
Step 1) VM Creation:
- Click the Launch on Compute Engine button to choose the hardware and network settings.
- You can see at this page, an overview of CloudMint Image as well as estimated cost of running the instance.
- In the settings page, you can choose the number of CPUs and amount of RAM, the disk size and type etc.
Step 2) RDP Connection: To connect to the deployed instance, Please follow Instructions to Connect to Windows instance on Google Cloud
Step 3) SQL Connection: To Connect Microsoft SQL Server Management Studio in windows server, Please follow Instructions to Connect Microsoft SQL Server Management Studio
Step 4) Database Credentials:
You can Login by below SQL Database credentials
SQL UserName : sa
The below screen appears after successful deployment of the image.
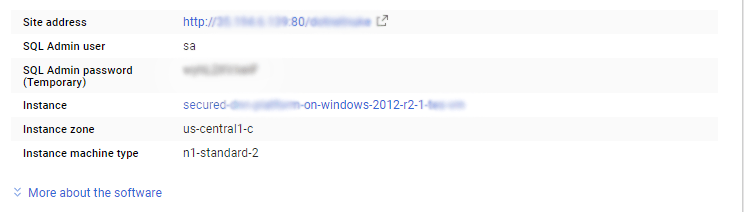
i) Please connect to Remote Desktop as given in step 2
ii) You can use SQL server instance as localhost. The SQL Server instance name to be used is “localhost” Connect to SQL Management Studio with username as sa and password provided in Custom Metadata.
Step 5) Other Information:
1.Default ports:
- Windows Machines: RDP Port – 3389
- sql server port :1433: By default, this is blocked on Public interface for security reasons.